Kubernetes is a system for automating deployment and orchestrating container applications. Right now, it is the most popular container orchestration tool in the world. Kubernetes has its page to show you how to install them here: Installing Kubeadm but for me it’s hard to follow.
This tutorial will help you install Kubernetes cluster that is very easy to scale later on. There are several methods to install Kubernetes in Ubuntu 20.04, but in this tutorial, we will use kubeadm. It is the most basic method to install Kubernetes.
Prerequisite
- Minimum of 2 VM Ubuntu 20.04
- Minimum CPU is 2 cores for each VM
- Minimum RAM is 2 GB for each VM
- Internet Connectivity
- No Firewall between the 2 VM
Kubernetes Setup Scenario
We will set up 1 master and 1 worker Kubernetes. While it is not recommended for a production environment, it is a good start if you want to learn Kubernetes or set up Kubernetes for a development/testing environment.
Later, you can add more masters and more workers as you need. To add more master or worker nodes, you can check my other tutorial on How to Join a Node to a Kubernetes Cluster
We will be using containerd as the container runtime, and calico for the network.
Sudo Privileges
Before starting, we make sure that we will have no permission issues during the installation & configuration process.
sudo su
Disable Swap
Note: Do this on all VM
Kubernetes will not work properly if you are using swap, so disabling them is required. To do this first disable swap with this command
swapoff -a
This will directly turn off the VM swap, but if the VM reboots, the swap will be enabled again. To persist the configuration, we need to disable swap on the fstab file. To do this, open fstab file:
nano /etc/fstab
Comment on the line that has swab in it:
# /etc/fstab: static file system information.
#
# Use 'blkid' to print the universally unique identifier for a
# device; this may be used with UUID= as a more robust way to name devices
# that works even if disks are added and removed. See fstab(5).
#
# <file system> <mount point>   <type>  <options>       <dump>  <pass>
# / was on /dev/ubuntu-vg/ubuntu-lv during curtin installation
/dev/disk/by-id/dm-uuid-LVM-dHWIhVMCwnoe0fuPwszTkF4PVTopcszZQgXdwwHeEJrTnJPdeDxmWc1AdXl9IVlG / ext4 defaults 0 0
# /boot was on /dev/xvda2 during curtin installation
/dev/disk/by-uuid/01afd7eb-3cca-4d4f-bccf-afffd738634a /boot ext4 defaults 0 0
#/swap.img      none    swap    sw      0       0
Enable Kernel Module
Note: Do this on all node
Enable br_netfilter and overlay modules using this command:
modprobe overlay
modprobe br_netfilter
You can check whether the required module is already enabled or not
lsmod | egrep 'br_netfilter|overlay'
Add Kernel Configuration
Note: Do this on all node
Create a new file under sysctl.d to place the kernel configuration:
nano /etc/sysctl.d/kubernetes.conf
Add these lines to the file:
net.bridge.bridge-nf-call-ip6tables = 1
net.bridge.bridge-nf-call-iptables = 1
net.ipv4.ip_forward = 1
Reload the kernel configuration
sysctl --system
Install Containerd
Note: Do this on all node
First, install the dependencies
apt install -y curl gnupg2 software-properties-common apt-transport-https ca-certificates
Add Docker Repo to apt
curl -fsSL https://download.docker.com/linux/ubuntu/gpg | apt-key add -
add-apt-repository "deb [arch=amd64] https://download.docker.com/linux/ubuntu $(lsb_release -cs) stable"
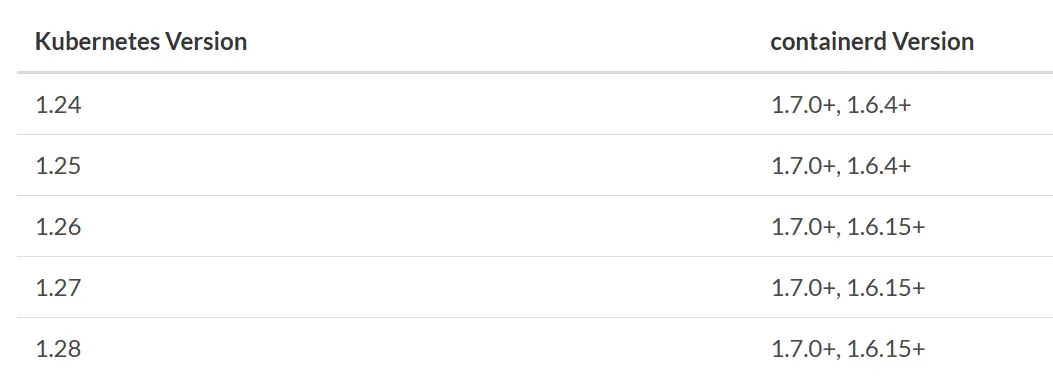
If we see the compatibility tables below, we know that to install k8s release 1.28, we need to install containerd version 1.6.15 or more. In this tutorial, we will install the latest containerd that is version 1.6.25.
Install the Containerd.
apt update
apt install containerd.io=1.6.25-1
Configure the Containerd using the default configuration
containerd config default > /etc/containerd/config.toml
In addition to that, config the containerd to use the systemd cgroup driver in the configuration. First, open the file
nano /etc/containerd/config.toml
Find this config and change the SystemdCgroup from false to true like this below:
. . .
            [plugins."io.containerd.grpc.v1.cri".containerd.runtimes.runc.options]
            BinaryName = ""
            CriuImagePath = ""
            CriuPath = ""
            CriuWorkPath = ""
            IoGid = 0
            IoUid = 0
            NoNewKeyring = false
            NoPivotRoot = false
            Root = ""
            ShimCgroup = ""
            SystemdCgroup = true
. . .
After that, we can restart and enable the containerd
systemctl restart containerd
systemctl enable containerd
Install Kubeadm Kubectl Kubelet
Note: Do this on all node
First, install the dependencies
apt -y install curl vim git wget apt-transport-https gpg
Add Kubernetes repo to apt
mkdir -m 755 /etc/apt/keyrings
curl -fsSL https://pkgs.k8s.io/core:/stable:/v1.28/deb/Release.key | sudo gpg --dearmor -o /etc/apt/keyrings/kubernetes-apt-keyring.gpg
echo 'deb [signed-by=/etc/apt/keyrings/kubernetes-apt-keyring.gpg] https://pkgs.k8s.io/core:/stable:/v1.28/deb/ /' | sudo tee /etc/apt/sources.list.d/kubernetes.list
Install the kubelet kubeadm and kubectl
apt update
apt -y install kubelet=1.28.4-1.1 kubeadm=1.28.4-1.1 kubectl=1.28.4-1.1
apt-mark hold kubelet kubeadm kubectl
After the installation, we can check the kubectl and kubeadm versions and make sure that we install the 1.28.4 version.
kubectl version --client && kubeadm version
Enable the kubelet so it will activate on boot
systemctl enable kubelet
Master Node Cluster Initiation
Note: Do this on the Master Node
First, we must set the k8s-endpoint DNS name to point to our localhost. Open the hosts file
nano /etc/hosts
Add this line
127.0.0.1 k8s-endpoint
Save and exit.
Pull all control node image
kubeadm config images pull
We can initiate the cluster by using kubeadm init and one option pod-network-cidr. Before you run this command, make sure that the pod-network-cidr subnet is not the same / intersects with your host network subnet. For example, if my host network is 192.168.1.0/24, try using 10.1.0.0/16 as a pod network.
kubeadm init --pod-network-cidr=10.1.0.0/16 --control-plane-endpoint k8s-endpoint:6443
Tips!
From my experience, It is recommended that we set the
--control-plane-endpointusing the DNS name when initializing the cluster. It will make our life easier when we want to scale the control plane from a single master to a multi-master cluster.If you want to scale the master node, you just need to change the
k8s-endpointto point to your Load Balancer IP by editing yourhostsfile. No need to break your existing Kubernetes cluster configuration.
If the initiation success you will get a message like this
Your Kubernetes control plane has initialized successfully!

To start using your cluster, you need to run the following as a regular user:

  mkdir -p $HOME/.kube
  sudo cp -i /etc/kubernetes/admin.conf $HOME/.kube/config
  sudo chown $(id -u):$(id -g) $HOME/.kube/config

Alternatively, if you are the root user, you can run:

  export KUBECONFIG=/etc/kubernetes/admin.conf

You should now deploy a pod network to the cluster.
Run "kubectl apply -f [podnetwork].yaml" with one of the options listed at:
  https://kubernetes.io/docs/concepts/cluster-administration/addons/

You can now join any number of control-plane nodes by copying certificate authorities
and service account keys on each node and then running the following as root:

  kubeadm join k8s-endpoint:6443 --token 7sibm4.kcawyjy2sakmpgjv \
        --discovery-token-ca-cert-hash sha256:c8ec1014a80209ba540c16451135b920b8ee82d717ae8df16d88b81564a321dc \
        --control-plane

Then you can join any number of worker nodes by running the following on each as root:

kubeadm join k8s-endpoint:6443 --token 7sibm4.kcawyjy2sakmpgjv \
        --discovery-token-ca-cert-hash sha256:c8ec1014a80209ba540c16451135b920b8ee82d717ae8df16d88b81564a321dc
Switch to a non-root user account by typing exit or just re-login using a non-root user, and execute this command:
mkdir -p $HOME/.kube
sudo cp -i /etc/kubernetes/admin.conf $HOME/.kube/config
sudo chown $(id -u):$(id -g) $HOME/.kube/config
It is not recommended to run the kubectl using root
Install Cluster Network Calico
Note: Do this on the Master Node
For the network, as we mentioned earlier we are using Calico. To install Calico, first, we execute this command:
kubectl create -f https://raw.githubusercontent.com/projectcalico/calico/v3.26.4/manifests/tigera-operator.yaml
After that, download the calico custom resources yaml file
wget https://raw.githubusercontent.com/projectcalico/calico/v3.26.4/manifests/custom-resources.yaml
Open the file
nano custom-resources.yaml
Find the cidr configuration, the default is 192.168.0.0/16, and change the IP matching the pod-network-cidr option when you initiate the cluster. For my case:
cidr: 10.1.0.0/16
After that, apply the custom resource object
kubectl apply -f custom-resources.yaml
This process will take some time until all of the pods are running, you can watch the process by executing this command:
kubectl get pod --all-namespaces --watch
Worker Node Cluster Join
Note: Do this on the Worker Node
First, we must set the k8s-endpoint DNS name to point to our master node. Open the hosts file
nano /etc/hosts
My master node’s IP address is 192.168.7.26, so I will add this line
192.168.7.26 k8s-endpoint
Save and exit. Please match the IP according to your own master node IP address.
To join the cluster, just copy-paste the join command for the worker node from the master node. For my case:
kubeadm join k8s-endpoint:6443 --token 7sibm4.kcawyjy2sakmpgjv \
        --discovery-token-ca-cert-hash sha256:c8ec1014a80209ba540c16451135b920b8ee82d717ae8df16d88b81564a321dc
If you encounter an error like this:
error execution phase preflight: [preflight] Some fatal errors occurred:
        [ERROR FileContent--proc-sys-net-bridge-bridge-nf-call-iptables]: /proc/sys/net/bridge/bridge-nf-call-iptables does not exist
Please make sure that you enable the br_netfilter and overlay modules.
Or, if it’s been a long time and the token has already expired, you can generate the join command again by executing this command on master node first:
kubeadm token create --print-join-command
It will generate the join command for you, and copy-paste the join command to your worker node.
Checking Cluster
To check everything is installed correctly, we can print the cluster status on the master node:
kubectl get nodes
It will display the master and worker nodes with ready status:
NAME        STATUS   ROLES                  AGE   VERSION
master      Ready    control-plane,master   43h   v1.28.4
node-1      Ready    <none>                 43h   v1.28.4
Congratulations, now you can install your own Kubernetes cluster in Ubuntu 20.04 using containerd and Calico which is easy to scale.